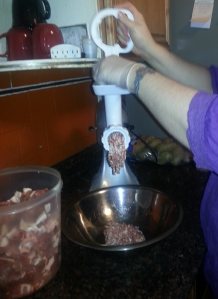
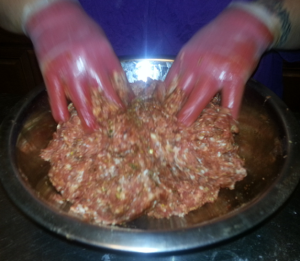
I never thought I’d be making my own homemade sausage. Well, you know that old saying… Never Say Never! My local grocery store had fantastic fresh Italian sausage that I used for a lot of different meals. But then one week I went in and suddenly it was gone. And the next week and the next. For some reason they decided not to make it anymore. My hopes were dashed as I didn’t have another place close that sold a good flavored sausage at an affordable price. They eventually resumed making it, but by that time I had already begun making my own. Now I don’t pay for other people’s sausage, I look for great buys on fresh meat and make my own.
There are basically 3 steps to making bulk sausage (meaning sausage without a casing):
- Cut up your big meat into small cubes
- Put your meat cubes through a meat grinder
- Season your ground meat into your favorite sausage
I was very intimidated when I began researching sausage making. But I quickly realized its not as complicated as I thought. The physical part is cubing and grinding the raw meat. That is the most time consuming part of the process. In order for the whole the process to be worth my effort, I won’t make a batch of less than five pounds. If there is a really low price on meat, I’ll make batches of 5, 10 or 15 pounds at a time and divide and freeze the finished sausage for later use. You can make sausage out of pork, beef, turkey, chicken, or venison. I prefer pork. And the cut of pork I prefer to use is the pork shoulder blade, also called the Boston pork roast or Boston Butt. Don’t be fooled by the name, the cut comes from the front top shoulder of the pig. It can be difficult to cut because of the bone inside and the connective tissues, but It has an excellent marbling of fat which is essential for sausage.
I can’t always get pork butt on sale, so I do improvise with other cuts. The last batch I made I used picnic shoulder which is farther down the leg of the pig and this cut always comes with a section of the skin still on (a little extra work to cut that off). The picnic is a leaner cut with less fat, so when I used this cut I had to add extra fat into the sausage. Some people will buy fat from their butcher, but I take a pound of frozen bacon and cut it into chunks and mix it in. It works fabulously to add moisture and flavor to a leaner cut. You can also use pork loin, but it’s generally more expensive and has very little fat. You’ll definitely have to add fat or bacon to it in order to have a good sausage.
If you have a Kitchen-Aid mixer, you can purchase the grinder attachment (about $50) and grind your own meat. There are also special grinder machines that are only for grinding, but I love my Kitchen-Aid because it does so many things with only having to store one machine.
Cutting & Grinding Tips:
- The grinder comes with 2 plates: a bigger hole and a smaller hole. This is where its going to squish the meat out. If you cut your meat into big chunks, you have to do the process twice. Once through the bigger hole plate then again through the small hole plate. Save yourself the time and cut the pieces in about 1 inch cubes.
- If you’re using a very lean meat, use additional fat pieces you have purchased or cut from other meat. Cut up bacon works excellent and is easy to find. Try to sprinkle in the fat (or bacon) pieces evenly throughout your container of meat cubes. Then as you’re feeding the meat into the grinder, you don’t have to think about when to add more fat.
- Do your work in stages. Set aside some time to cut up your meat. Return to fridge as soon as possible. Clean up and take a break. Your hands will get tired and a break makes each step easier to get through.
- The colder the meat, the easier it is to cut. Some people will only cut up their meat when it’s near frozen, but I that is too hard for me. I just keep it in the very back of the fridge where it’s the coldest. However, it’s hell on the fingers! I put a knit glove on my left hand, then cover it up with a disposable vinyl glove (my skin is easily irritated, so I have a box of gloves in my kitchen for when I handle certain foods or chemical cleaners). It may look wacky to have two gloves on one hand, but one keeps my left hand warm the other keeps the glove clean.
- NEVER grind room temperature meat if you can help it. The fat portions of the meat get soft and gooey and will clog your machine. Also the fat starts to melt when it comes into contact with the heat from your hands–big greasy mess! So keep it cold right until the time you’re going to start putting it through the grinder. You can even pop it in the freezer for a little bit (15-30 minutes) right before grinding to make it easier to go through the machine.
If you don’t want to cut your own meat, you can buy pork, beef or chicken already cut up. Look for packages labeled “taco meat” or even “fajita” meats. These will already but cut down into small cubes or strips. Much more expensive than cutting it yourself, but you get to skip the cutting process. These you can grind yourself.
If you want to avoid the cutting and grinding all-together, you can buy fresh meat already ground and season it up how you like. Some of the larger grocery stores package fresh beef, pork and turkey already ground, ready for purchase in the meat case. If you shop at a smaller store with a full service butcher, you could ask them to grind your meat for you (they may charge you a fee or they may do it for free).
After you get past the cutting and grinding part, all that’s left is the spice recipe. The same meat can be turned into a variety of sausages. Right now I focus on Italian sausage and breakfast sausage. I have the special “horn” attachment for my grinder so I can stuff the sausage into casings, but I have yet to use it. I find plenty of uses for the meat in its bulk form.
So now that I’ve explained all about step one cutting and step two grinding, step three is seasoning:
Carol’s Italian Sausage Seasoning Blend
This recipe is based on approximately 5 pounds of ground meat.
- 3 Tbsp dried Oregano
- 3 Tbsp granulated Garlic
- 2 Tbsp Sea Salt
- 1 tsp Ground Black Pepper
- 2 Tbsp Paprika
- 1 Tbsp dried Parsley Flakes
- 1 tsp Cayenne Pepper
- 1 Tbsp Crushed Red Pepper Flakes
- 1 Tbsp Whole Fennel Seeds
- 1 tsp Ground Fennel Seeds
- 2 tsp granulated Onion or powder
- 1 tsp Chili Powder
- 1/2 Tbsp Dried Thyme
- 1 Tbsp white sugar
- 3/4 c. to 1 c. cold Red Wine Vinegar (or substitute cold water)
In a large bowl with plenty of room, place your ground meat, then cover with the dry seasonings. Pour 3/4 cup of the COLD Red Wine Vinegar on top. This will ensure the absorption of the seasoning and keep the moisture in the meat. Without the liquid your meat will turn out dry. Using both hands, mix seasonings into meat. If mixture still seems a bit dry, add in the rest of the liquid. If you don’t have red wine vinegar (gives best flavor) use water. I have tried various red wines, but didn’t like the flavor it gave the finished meat.
Liquid must be COLD to absorb into the meat. If you use room temperature or warm liquid you’ll get meat mush.
This is another instance where I wear knit gloves underneath the disposable gloves. That meat is cold!
Let set in fridge for 1 hour for flavor to develop. I have experimented many times with my spice blend based on my own tastes. Whenever you do something like that you have to test it. To test your flavor, take a small portion and fry it up in a small pan. If it tastes good, you’re done. If the flavor isn’t up to your expectations, now is the time to time to add more seasonings. It took me MANY trials to come up with the right balance. If you know your spices and know what you like, you can come up with your own unique blend. Just make sure you write down the spices and amounts you’re trying and what the results are. Otherwise you’ll keep getting your blend wrong (made that mistake and ruined an entire batch of meat).
So, now that you’ve got the sausage, what can you do with it?
- Fry fresh sausage into crumbles for pizzas. Freeze on parchment paper on cookie sheets. Once frozen, transfer to baggie and return to freezer. This is important–freeze it flat first! If you put it into a bag then freeze it, it will solidify into a brick and you won’t be able to use it unless you thaw the entire block. To use on pizzas, take out what you need and sprinkle frozen sausage pieces onto pizza. Cook pizza as normal. Meat will thaw and heat while pizza dough cooks.
- Form into patties to make Italian sausage burgers. Place formed patties onto parchment lined cookie sheets and freeze. Once frozen, bag patties individually for freezer or if bagging in bulk, separate patties using parchment or waxed paper to prevent sticking. Frozen patties can be fried in frying pan or on the grill. Thawing patties in advance of cooking will speed cook time. Best thawed gradually in the fridge. Microwave thawing patties will cause the edges of the patties to cook before the middle is completely thawed.
- For bulk sausage for later use in spaghetti or other recipes, measure out 1 or 2 pounds and freeze in bags. Thaw and cook as needed.
If you like this, try my Homemade Breakfast Sausage.


